Key Takeaways
- Mirror finishing requires progressive grit sanding (120–2000 grit), cut buffing, and final color buffing in sequence
- Start at 120–240 grit and work up through 400, 600, 800, 1000, and 1200–2000 grit before buffing
- Each stage must fully remove the previous stage's scratch marks before you move on
- Reusing wheels or cloths across stages causes cross-contamination and reintroduces scratches
- For complex geometries or high-volume production, professional metallizing services deliver consistent mirror finishes manual polishing cannot replicate
What Is a Mirror Finish on Stainless Steel?
A mirror finish is technically defined as a highly reflective surface with a surface roughness average (Ra) of less than 0.2 microns, often reaching 0.1 microns. At this level, the steel is smooth enough to produce near-perfect reflections with minimal distortion. Industry standards classify this as a "No. 8" finish under ASTM A480, the top tier in ASTM's stainless steel surface finish classifications.
How Mirror Finish Compares to Other Stainless Steel Finishes
To understand where mirror finish sits on the spectrum:
- No. 1 / Mill Finish: Dull, nonreflective surface with Ra values of 3.5–7.5 µm
- No. 2B / Cold-Rolled: Standard mill finish with Ra of 0.3–0.5 µm
- No. 4 / Brushed/Satin: Linear grain texture with Ra of 0.18–0.64 µm
- No. 8 / Mirror Finish: Highly reflective with Ra ≤ 0.1 µm, producing clear reflections
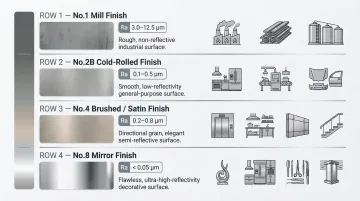
Reaching that Ra ≤ 0.1 µm threshold requires more preparation stages than any other finish on this list.
Practical Benefits Beyond Aesthetics
A mirror finish delivers more than visual appeal:
- Fewer surface crevices give bacteria and debris nowhere to accumulate, making the surface easier to clean
- Ultra-smooth surfaces stabilize the protective chromium-oxide film, improving corrosion resistance
- Hides weld seams and prior surface damage when the polishing process is executed correctly
How to Polish Stainless Steel to a Mirror Finish: Step-by-Step
Step 1: Clean and Prepare the Surface
Any contamination—grease, oil, debris, or moisture—will embed into the finish during sanding. Clean the surface thoroughly with mild detergent (dish soap works well) and a non-abrasive sponge, then dry completely before proceeding.
Assess surface damage before starting:
- Light scratches and dullness: start from 240 grit
- Deep gouges, weld marks, or pitting: start from 80–120 grit to level the surface first
Safety requirements:
- Wear eye protection and gloves when working with power tools
- Ensure adequate ventilation when using chemical cleaners or polishing compounds
- Keep a bare hand available to test workpiece temperature regularly
Step 2: Progressive Grit Sanding
Progressive sanding is where mirror finishes are won or lost. Each grit stage exists for a reason — skip one, and the next stage can't compensate.
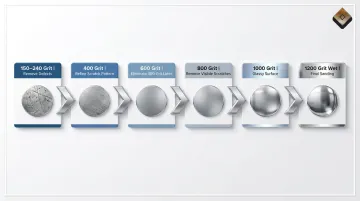
The grit progression sequence:
- 150–240 grit: Remove surface defects and deep scratches
- 400 grit: Refine the scratch pattern left by coarser grits
- 600 grit: Eliminate 400-grit lines; surface starts to look uniform
- 800 grit: Remove the last visible scratch marks before wet sanding
- 1000 grit: Surface should feel glassy and show faint reflections
- 1200 grit (wet): Final sanding stage using water or cutting fluid to reduce heat
Critical technique rule:
Rotate your sanding direction 90° each time you advance to a new grit. Do not move to the next grit until all scratch marks from the previous stage are completely eliminated. Most DIY failures happen right here—advancing too soon.
Tool settings:
- Angle/disc sanders: 20,000 RPM max for 2" diameter; 15,000 RPM max for 3"; 12,000 RPM max for 4"
- Inline sanders: 1,600–3,500 RPM for straight-line scratches
- Maintain consistent speed and even pressure to prevent uneven material removal and swirl marks
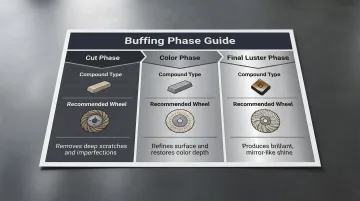
Step 3: Cut Buffing with Abrasive Compound
After sanding, the surface still contains fine micro-scratches invisible to the naked eye. Cut buffing eliminates these and flattens the surface further.
What you need:
- Coarse or medium polishing compound (black emery or tripoli-based)
- Sisal or stitched cotton buffing wheel
Technique:
- Apply compound sparingly to the wheel, not the workpiece
- Keep the piece moving at all times to avoid heat buildup
- Maintain consistent pressure—lingering in one spot overheats the steel, causing discoloration or "orange peel" texture
Common mistake to avoid:
Dedicate one wheel and cloth exclusively to each compound grade. Using the same wheel for different compounds reintroduces scratches at the worst possible stage.
Step 4: Color Buffing and Final Polish
Once cut buffing removes the micro-scratches, color buffing is what transforms a hazy surface into a true mirror. This final compound stage brings out full reflective brilliance.
What you need:
- Fine finishing compound (green rouge or dedicated stainless steel mirror compound)
- Soft loosefold or untreated cotton mop
Evaluation:
The surface should show a clear, undistorted reflection. If haze or swirl marks remain, revisit the cut buffing stage rather than trying to buff them out here.
Final wipe-down:
Remove all compound residue with a clean, lint-free microfiber cloth. Optionally apply a stainless steel polish or protective coating to seal the finish and protect against fingerprints and oxidation.
Key Variables That Affect Your Mirror Finish Results
Two people can follow the same steps and get very different results because outcome quality depends on several variables that must be actively managed.
Grit Progression and Sequence
Jumping from 240 grit to 800 grit is the single biggest cause of failed mirror finishes. Finer abrasives cannot cut deeply enough to remove the deformation left by coarser grits — each step must eliminate approximately 3x the deformation depth of the prior one. The coarser scratch pattern stays trapped under the finer polish and shows up clearly under lighting once buffing begins.
The steel grade also shapes your approach:
- Austenitic (304, 316): Work-hardens rapidly; requires positive feed and sharp abrasives to prevent glazing
- Martensitic (410, 420, 440C): Can be heat-treated to 60 HRC; much harder to polish when hardened
- Free-machining grades (303, 416): Contain sulfur for machinability but have reduced corrosion resistance; not recommended for high-purity mirror applications
Buffing Speed and Pressure
Excessive RPM or pressure generates heat, causing stainless steel to discolor. Heat tint starts at approximately 290°C (pale yellow) and progresses to 600°C (dark blue) as the surface oxide layer thickens. Once bluing occurs, you must go back to an earlier sanding stage to remove it.
A simple field check: touch the workpiece briefly with a bare hand. If it's uncomfortably hot, reduce speed or pressure immediately.
Recommended RPM limits by wheel diameter:
- 6"–8" buffs: Max 3,600 RPM
- 9"–10" buffs: Max 3,450 RPM
- 11"–12" buffs: Max 3,000 RPM
- 16"–18" buffs: Max 2,400 RPM
Compound Selection and Wheel Type
Compound grade and wheel type must be matched to each phase — the wrong pairing either underperforms or damages the surface:
| Phase | Compound | Wheel | Purpose |
|---|---|---|---|
| Cut | Black emery or aggressive cutting compound | Sisal or stiff airway | Remove sanding scratches and flatten surface |
| Color | Yellow or white medium compound | Pink or spiral-stitched cotton | Refine cut phase, remove haze and tiger striping |
| Final luster | Green chrome rouge or ultra-fine mirror compound | Loosefold or Canton flannel | Fill microscopic pores and deliver distortion-free reflection |
Surface cleanliness matters as much as compound choice — contamination between stages can undo every step that came before it.
Surface Cleanliness Between Stages
A single abrasive particle from a coarser stage contaminating the next will leave visible scratches in the final finish. Wipe the workpiece completely clean between every stage and change or clean gloves to avoid transferring grit.
Abrasives previously used on carbon steel are a separate hazard. They transfer "free iron" particles onto stainless steel surfaces, and in the presence of moisture, embedded iron creates a miniature galvanic cell that causes rapid, localized rust and pitting. Use dedicated, color-coded abrasives exclusively for stainless steel.
Common Mistakes to Avoid When Mirror Polishing Stainless Steel
Three mistakes consistently derail mirror polishing projects — and all three are easy to avoid once you know what to watch for:
- Rushing the sanding sequence — Skipping stages, especially wet sanding above 800 grit, is the most common reason a finish looks shiny but lacks true clarity. Scratches become obvious under directional light.
- Cross-contaminating buffing equipment — Using the same wheel for two compound grades embeds coarser particles into finer work, creating new scratches at the worst possible stage. Dedicate separate wheels and cloths to each compound and label them.
- Overheating the surface — Heat turns stainless steel blue or gold through oxidation, requiring a full restart from an earlier sanding stage. This happens when the tool lingers in one spot during buffing rather than keeping consistent motion.
When Mirror Polishing DIY Isn't Enough: Professional Finishing Options
DIY mirror polishing has real limits. Three situations typically push fabricators toward professional options:
- Complex or curved geometries where flat sanding tools can't reach consistently
- High-volume production where manual polishing is too slow or inconsistent
- Tight surface roughness specs (Ra < 0.1 microns) that require controlled industrial processes
Professional Metallizing and PVD Finishing
Professional metallizing and PVD (Physical Vapor Deposition) finishing are the industrial-grade alternative. These processes deposit ultra-thin, highly reflective metal coatings onto substrates with a consistency and surface quality manual polishing simply can't match — across cosmetic packaging, automotive trim, architectural hardware, and more.
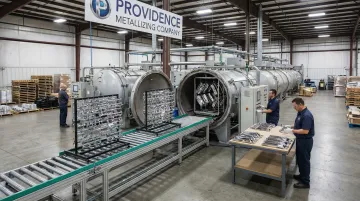
Providence Metallizing Company — with over 60 years of finishing experience and approved supplier status with Estée Lauder and L'Oreal — is built for exactly this scale. Their capabilities include:
- Processing over one million parts per week while managing 20+ jobs simultaneously
- Vacuum metallizing that produces highly reflective (mirror-like) finishes on plastic, metal, and glass substrates
- PVD coatings including titanium nitride, zirconium nitride, and chrome nitride for decorative and functional applications
- Four-step metallizing process (pre-treat, basecoat, metallize, topcoat) delivering superior adhesion and durability
For complex-geometry cosmetic closures, curved automotive components, or architectural hardware with intricate profiles, professional metallizing ensures consistent Ra values and reflectivity levels across thousands or millions of parts—impossible to replicate manually.
Other Professional Finishing Alternatives
| Method | How It Works | Achievable Ra | Best For | Limitations |
|---|---|---|---|---|
| Electropolishing (ASTM B912 / ISO 15730) | Stainless acts as anode in a heated acid bath; dissolves 5–10 µm of surface metal, leveling microscopic peaks into a corrosion-resistant finish | 0.10–0.80 µm | Complex geometries, ultra-low Ra requirements | Sharp edges erode preferentially; deep crevices may shadow |
| Vibratory/Mass Finishing | Parts and abrasive media tumble at 1,000–3,600 VPM in a trough or bowl, progressively smoothing surfaces | Below 0.2 µm Ra (medical-grade) | High-volume small parts; medical implants (titanium, cobalt-chrome, stainless) | Limited to certain geometries; tight tolerances (±0.001") |
| PVD/Metallizing | Vacuum-deposited metal coatings applied over pre-polished substrates | Mirrors substrate Ra; highest reflectivity | Mixed materials, cosmetic and architectural parts, highest consistency | Requires pre-polished substrate for best results |
Frequently Asked Questions
How do professionals polish stainless steel?
Professional polishers use industrial-grade buffing machines with controlled speed settings and sequential compounds matched to specific wheel types. For the highest-quality results, they often follow mechanical polishing with electropolishing or PVD coating to lock in the finish.
What is mirror polish stainless steel?
Mirror polish stainless steel is a surface finish with an Ra value below 0.2 microns (industry standard No. 8 is ≤0.1 µm), achieved through progressive abrasive sanding followed by multiple compound buffing stages, resulting in a highly reflective surface that produces clear, undistorted reflections.
How is a mirror polish achieved?
The process involves three core stages: progressive grit sanding from coarse to ultra-fine (120–2000 grit), cut buffing with abrasive compound to eliminate micro-scratches, and color buffing with a fine mirror compound on a soft wheel to bring out full reflectivity.
How do you get scratches out of stainless steel mirror finish?
Start at a grit slightly coarser than the scratch depth — typically 400–600 grit for light marks — then work back through the full polishing sequence. Deep gouges require dropping to 120–240 grit before progressing.
Can you mirror polish stainless steel by hand?
Hand polishing rarely achieves a true mirror finish (Ra < 0.2). Consistent pressure and speed are critical at fine grit stages, and maintaining both manually over larger surfaces is impractical. Power tools are strongly recommended.
How long does a mirror finish on stainless steel last?
A mirror finish is durable but can be dulled by scratches, hard water deposits, or abrasive cleaners over time. Regular maintenance with a stainless steel polish and non-abrasive cloths, along with avoiding steel wool or harsh chemicals, can preserve the finish for many years.